Objects
Objects page gives users an overview of all database objects available, allowing to create a data catalog to easily manage data assets.
The Objects view can be accessed on the Catalog page under the Objects tab.
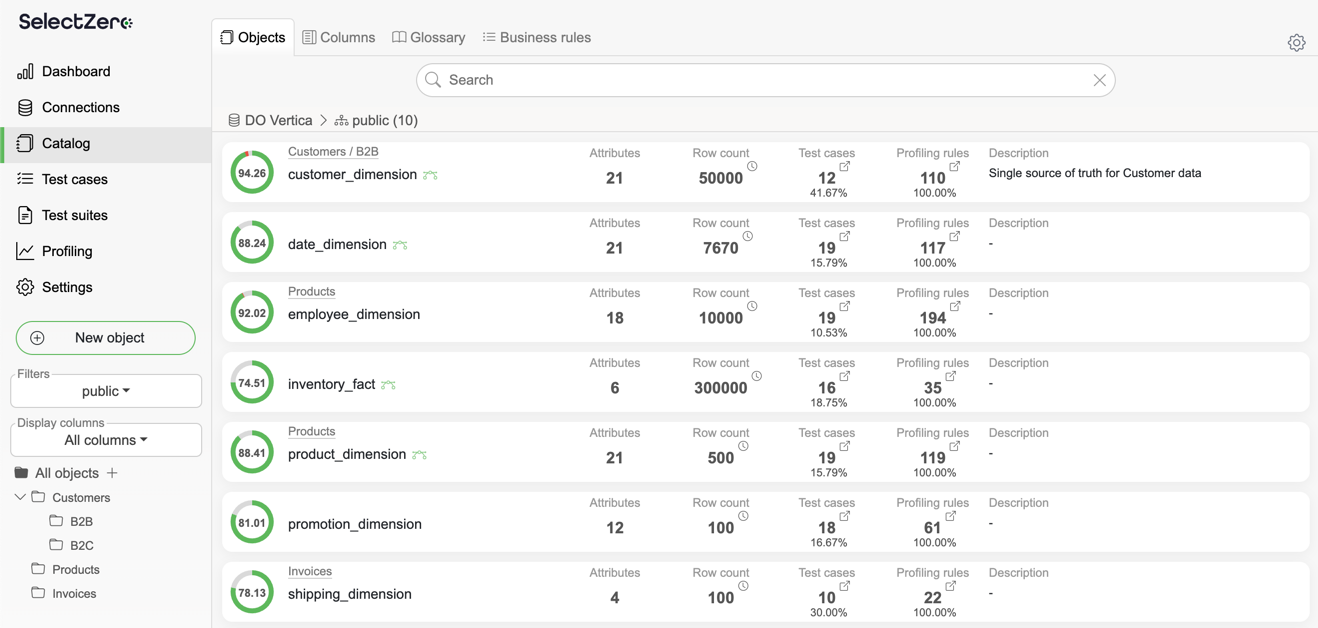
For every catalog object you can see its:
Quality - data quality metric calculated based on test cases and profilings
Object - object name in database
Dataset - the dataset the object is assigned to
Connection/Schema - where the object lives
Attributes - number of attributes (columns) of the object
Test cases - number of related test cases; hovering reveals a button that opens them on the Test cases page
Profilings - number of related profilings; hovering reveals a button that opens them on the Profiling page
Database comment - technical comment from database metadata
Description - business definition of the object
Labels - custom labels assigned to the object
Custom fields - every custom field enabled for the entity type
Object
The visible columns and their order can be customized from the table settings in the table header. Applied filters can be cleared in one click, restored from the filter history, or shared with other users via a copied link.
Object detailed view
Clicking on an object name opens a detailed view, allowing users to get insights on attribute level. Users can view metadata and metrics, add comments, and manage related business terms from Glossary.
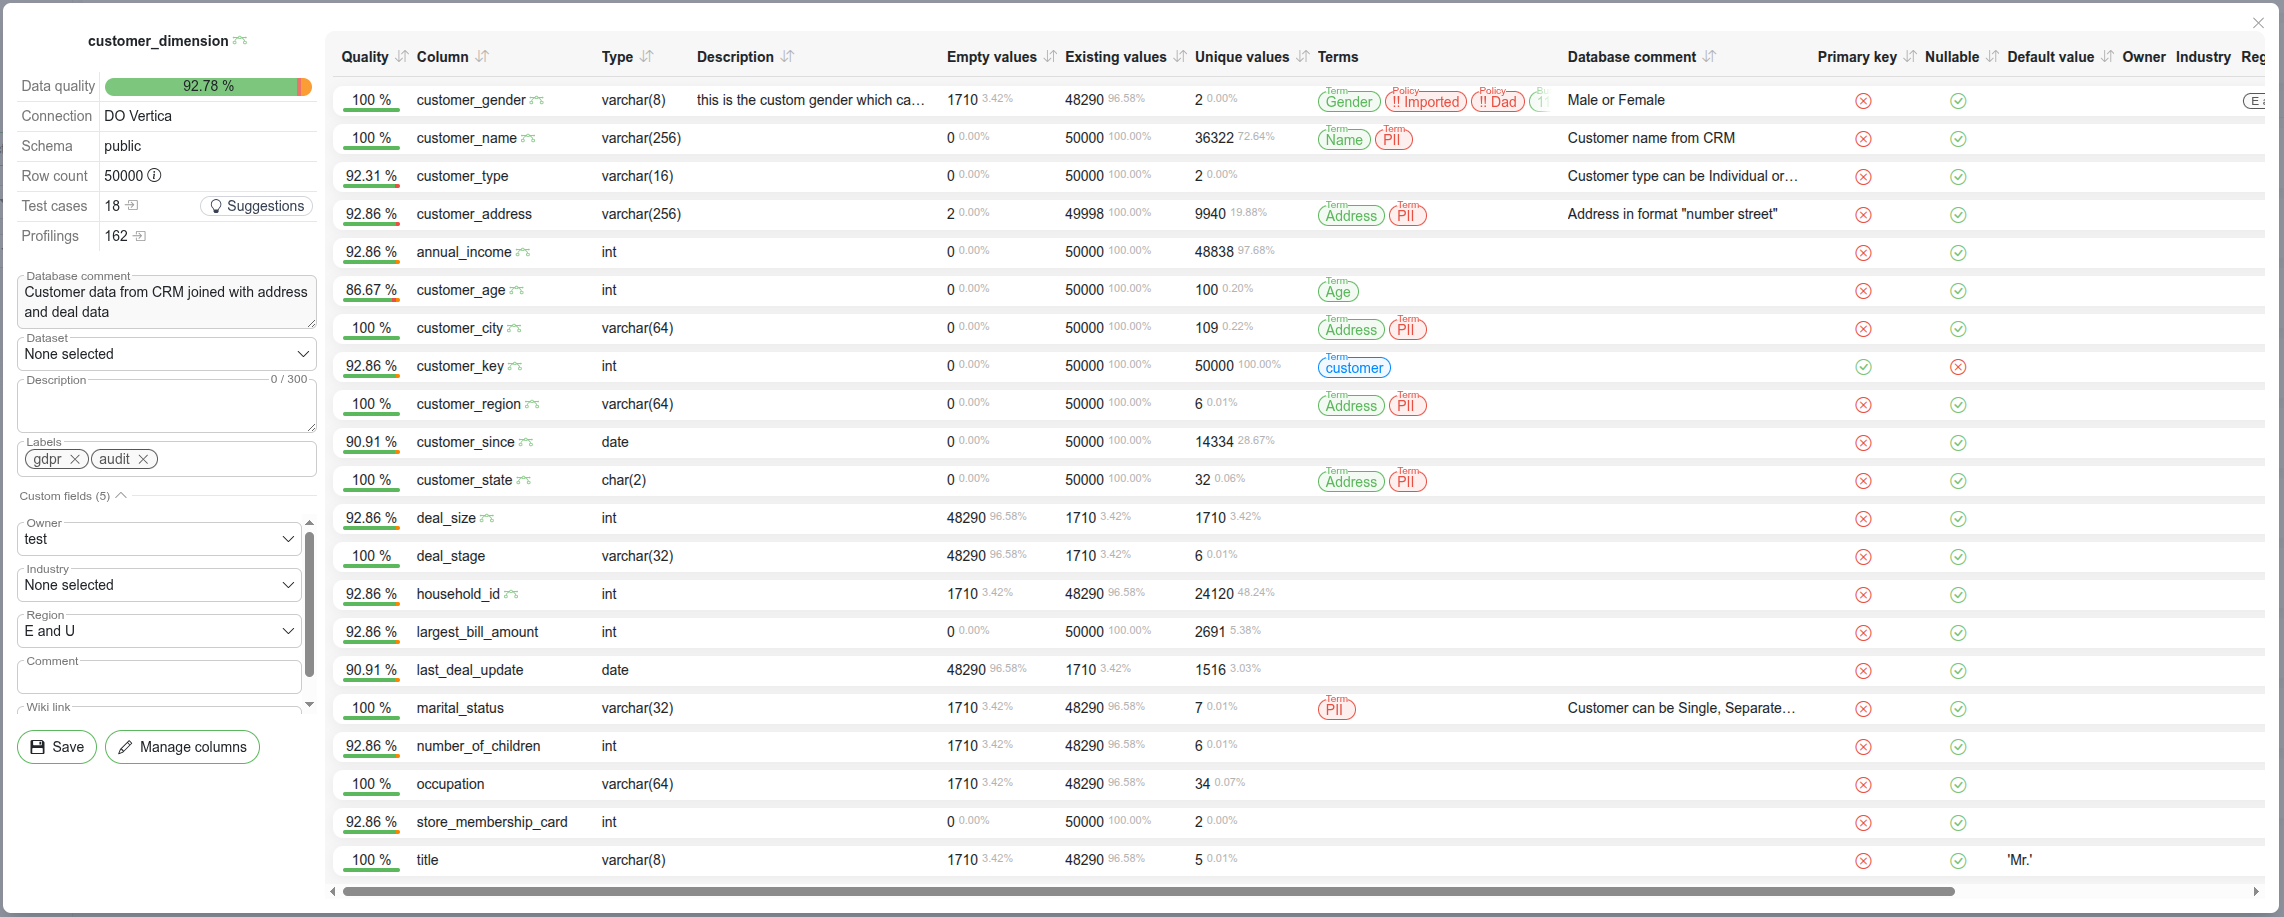
From the view's header the user can copy a direct link to the object, browse the object's history via Audit history  and configure alerting for object changes via Entity alerting
  .
.
The sidebar shows the object's metadata (connection, schema, last sync time and data quality) together with Row count and Freshness cards fed by the object's primary profiling, and new freshness checks can be added right from the card with Add check. Below the metadata the user can:
Set the Dataset the object belongs to
Edit the Description - custom free text field describing the object (the technical Database comment is shown read-only)
Add Labels to group objects
Edit the object's Custom field values.
The main area of the view is organized into tabs:
Attributes - attributes of the object
Lineage - opens the object's Lineage
Dependencies - shows all upstream and downstream dependencies of this object across the data landscape
dbt - dbt metadata; only shown for objects synced from a dbt project
Data - a sample of the object's actual data; requires the View sample data privilege
Test cases - shows the test cases related to the object. You can also create test cases directly from this tab.
Profilings - opens the Profiling page for this object; the tab is disabled when the object has no profilings
Clicking on a row in the attributes table will open that attribute's detailed view.
Dependencies
The Dependencies tab shows all upstream and downstream column-level dependencies for the catalog object, giving a full picture of where this object is used and what it depends on.
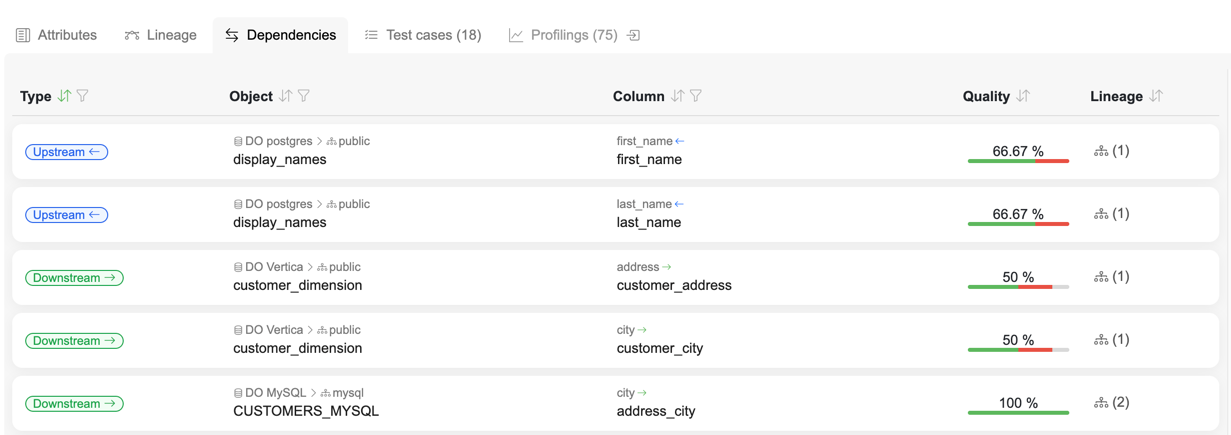
The tab displays a filterable table where each row represents a column-level dependency:
Direction - Downstream means this object feeds data into the related object; Upstream means this object consumes data from it
Related object - connection, schema, and object of the related catalog entity
Related column - the source and target column pair that form the relation. Arrow color indicates the relation type:
Green / Blue - directed relation (downstream / upstream)
Gray - foreign key relation
Orange - general related relation
Quality - data quality bar showing the pass/fail/error/not-executed test case result ratio for the related column
Lineage - button showing the number of steps in the relation path; clicking it opens the column-level lineage view
The same dependency view is also accessible directly from a test case via the impact and root cause analysis.
Creating test cases from object view
From the Test cases tab in the object detailed view, test cases can be created directly for the current object.
Open an object's detailed view and navigate to the Test cases tab
Click the "New test case" button and pick a generator:
AI Assistant - describe the check in natural language, see AI Assistant. Only offered when the assistant is enabled and the user has the Allow AI assistant privilege
Dynamic rules - build the SQL from a dynamic rule
Standard validations - pick a predefined validation type
The object context (connection, schema, object) is pre-filled automatically
Fill in remaining details and click "Create" or "Create and execute"
The Suggestions button beside it proposes test cases for the object. It is shown once the object has profiling data to base suggestions on, or when the AI assistant is enabled.
After creating a test case, the object's data quality metric and test case count refresh automatically to reflect the new test.
Smart search
The Objects tab has a smart search box that suggests scoped filters as you type. Type any text and within ~500 ms a dropdown appears with the matching suggestions, grouped by type. Pick a suggestion to apply it as a filter to the objects list, or press Enter to accept the top result.
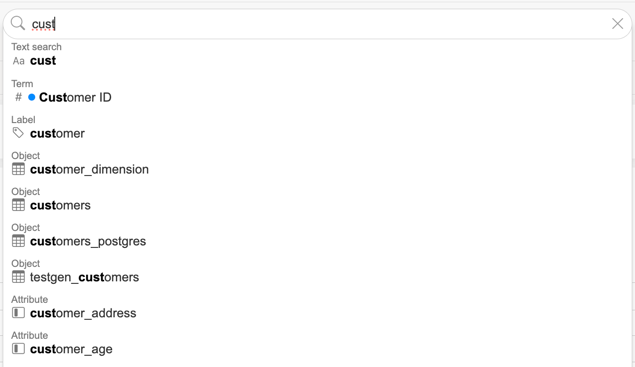
The following suggestion types are available:
Text search - match the typed string against object and attribute names and descriptions (free-text search)
Object - match a specific catalog object (table / view name)
Attribute - match a specific attribute across all objects
Label - match a custom label assigned to objects
Term - match a business glossary term linked to an attribute; the suggestion shows the term's color dot
By default suggestions respect any filters already applied (dataset, connections, etc.), which the dropdown exposes as a "Search only within applied filters" checkbox. Unchecking it searches across all assets, ignoring the filters. Click the × button on the right of the search input to clear the active suggestion and return to the unfiltered list.
Bulk actions
The Edit button above the results switches the list into selection mode. The user can select individual rows (or all results matching the current filters via the header checkbox) and then:
Assign - set the Dataset or a Custom field value for all selected objects at once. Assigning an empty dataset clears the dataset from every selected object, so a confirmation is shown first.
Enrich - generate descriptions, related terms and custom field values for the selected objects with AI enrichment
Description enrichment with AI
Catalog objects and attributes can be enriched with AI-generated content, either in bulk from the Objects tab or for a single object from its detailed view.
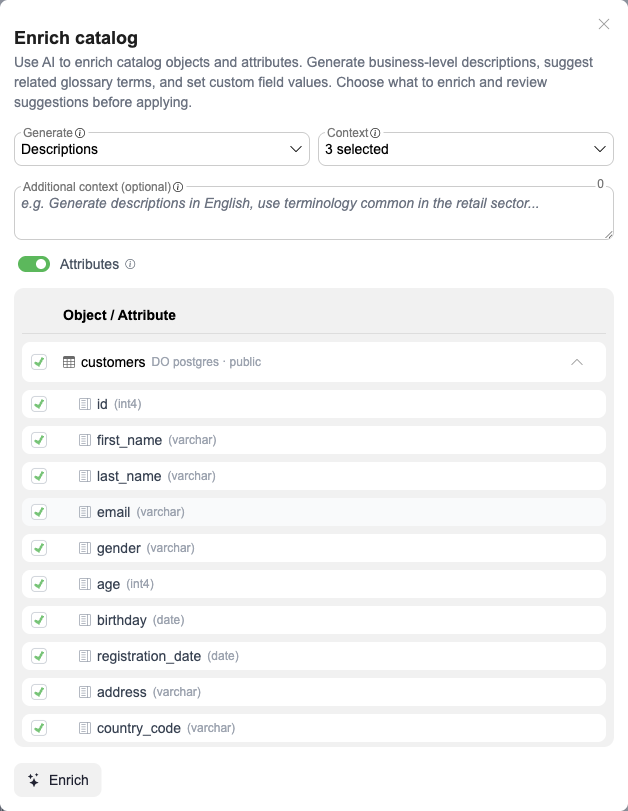
On the Objects tab press Edit, select the objects to enrich and click the "Enrich" action (stars icon) in the toolbar. In an object's detailed view the same Enrich button sits below its properties
Select step - review the selection. Objects and Attributes control what is included; with Attributes enabled, expand an object's row to pick individual attributes
Generate - what the AI produces: Descriptions, Related terms (business terms, attributes only) and Custom fields
Context - what the AI is given: Metadata (names, data types and existing descriptions), Assigned terms (terms already linked to each attribute), Column values (distinct example values per attribute from Profiling) and Sample data (up to 20 distinct values per column from a live sample of the table)
Additional context (optional) - free-text instructions added to every prompt, for example the output language or domain terminology. These take priority over existing descriptions, so they can also be used to rewrite or translate them
Preview step - review the suggestions and edit any of them inline. Rows that would overwrite an existing value are highlighted and left unchecked, so applying does not replace curated content by default
Click "Apply selected" to write the checked suggestions to the catalog
Datasets
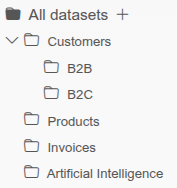
Datasets can be created to group specific catalog objects, and they can be nested to build a folder structure. The datasets dropdown in the toolbar filters the list to the selected dataset (including its sub-datasets), and its search box narrows a long dataset list.
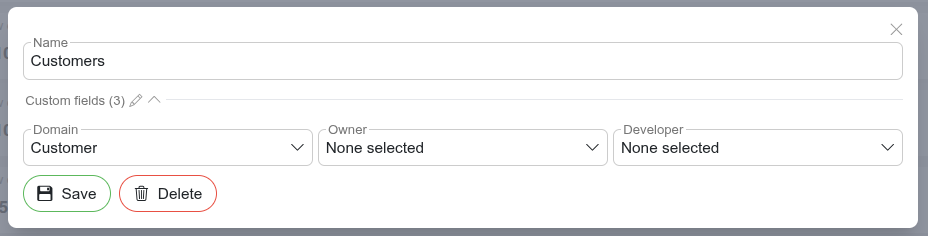
The folder button next to the dropdown opens the Datasets modal, where datasets are created, edited and deleted. Datasets also support configuring custom fields.
Assigning objects to datasets
Objects are assigned via the Dataset field in the object's detailed view, or in bulk: press Edit above the results, select the objects, and use Assign to set (or clear) the dataset of all selected objects at once.
Custom metadata
Clicking the "New object" button 
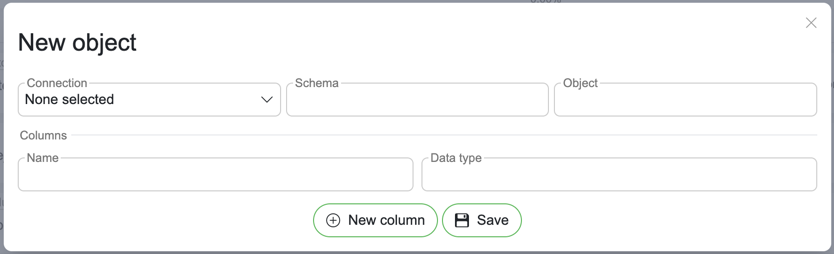
Connection – Select the connection under which the new metadata will be added.
Schema – Click the schema field to view suggested schemas based on the selected connection, or enter a new schema manually.
Object – Enter a name for the new object.
New column button – Adds a new row for inserting a column.
Manage columns
Name – The name of the new column.
Data type – Click to select an existing data type or enter a new one manually.
Remove column – Click the trash icon
 to remove a column. Removal asks for confirmation, and warns when the object is also linked elsewhere.
Save – Confirms and saves all inserted values.
Modifying existing metadata can be done from the object detail view by clicking the "Attributes" button 
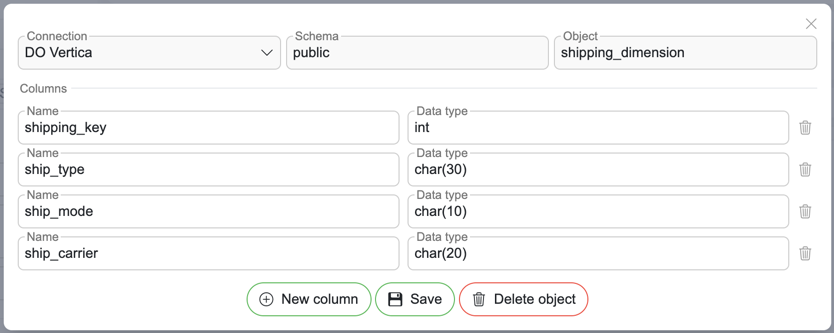
Connection – The objects connection will be preselected.
Schema – The objects schema will be preselected.
Object – The object name will be preselected.
New column button – Adds a new row for inserting a column.
Manage columns
Name – The name of the column.
Data type – Click to select an existing data type or enter a new one manually.
Remove column – Click the trash icon
to remove a column. Removal asks for confirmation, and warns when the object is also linked elsewhere.
Save – Saves all changes.
Delete object – Use with caution. This will remove the object and all its columns.